Friday 31 January 2014

Selfmade PUL-covers

I was sure that I will never sew PUL (polyurethane laminate) -covers for the diapers, I assumed those would be difficult to make because you have to do get it right from the start. Once you make a hole in the cover fabric it cannot be fixed. But I was insecure for no good reason. Once I started these were so easy to make.


I googled pattern for a diaper cover and found one from Kiedo (in Finnish). I actually did not use their pattern, just their instructions. I took the pattern from a bought PUL-cover I had at home and which had prooven to be good in use. I made only two, I do still have more of the fabric but I do not need that many covers in same size. I think I can make new bigger covers later if Likka needs them.

Wednesday 29 January 2014

Cloth diaper pile

I have gone officially cuckoo about cloth diapers. Like I mentioned in the previous post I have really liked making cloth diapers. It's just so rewarding. Firstly I can finally use up some of the material I have piled up over the years, secondly I can save money when making the diapers instead of buying pacs and pacs of disposable diapers, thirdly I can do my hobby, sewing, and make something usefull at the same time.

Before Likka was born I made two fitted diapers using a pattern from a book Vaippailmiö. I'm glad I had made only two of those diapers. The pattern I used has been good, but I did have to add rubber bands on the crotch and I had sewn way too little absorbing material inside the diapers. But without these trial diapers I wouldn't have known how to make better ones.


Using those trial diapers as a starting point I made seven fitted diapers more. This time I used a lot more absorbing materials inside. I used so much that the rag pile we had is now completely used up. Which is great!

I first made the three tartan patterned diapers. The tartan fabric was sewn into half finished pajama trousers by my grandmother. She no longer sews so she gave the trousers to me to finish, but I didn't need trousers so I cut the trousers up for diaper material. I sewed the rubber band between the inside layer and outside layer, the diaper just looks better that way. The tartan patterned diapers have dry cloth inside, but it was not very vise to use that fabric on the whole surface, just a small piece on the center would have been enough. Lots of the dry cloth got wasted because the shape of the diaper is so curvy.


After the tartan patterned ones I made four more, two using stripy flanned on the outside and and two with small blue flowers on white backround flannel fabric (the other was on laundry when I took these pictures). Instead of using the dry cloth on the whole surface I sewed a flap from micro fleece. I was going to use dry cloth on these too, but the fabric store did not have it anymore. Micro fleece works well too.

We have used these a few times already so they do not look pristine anymore, incase you are wondering why these do not look perfectly white.

Monday 27 January 2014

Cloth diapering 0-4 months

I promissed to write about our experience about the cloth diapering. Overall we have been very pleased with the cloth diapers and I think I have been even bit too excited about the cloth diapers at times (just ask A). This is a long post, so just incase you are not that interested to read the whole thing, here is an introduction in form of pros and cons.
Pros of using cloth diapers
+ Saves money, especially if the diapers are bought used
+ You can make them yourself
+ Saves trips to the grocery store
+ You do not have to take out trash constantly
+ Cloth diapers do not smell like piss
(+ Saves the environment, I have no facts so I'm not getting into this)
Cons of using cloth diapers
- There is more laundry (although not as much as you would think)
- Cloth diapers take more space, if there is very little storage at your home then this might be an issue
- Cloth diapers are bigger, some clothes might not fit from the bum
- If outside home you have to carry the dirty diapers back home
- You do need to study different cloth diaper types and get the hang of them, but once you've done that it's really easy
∞ ∞ ∞

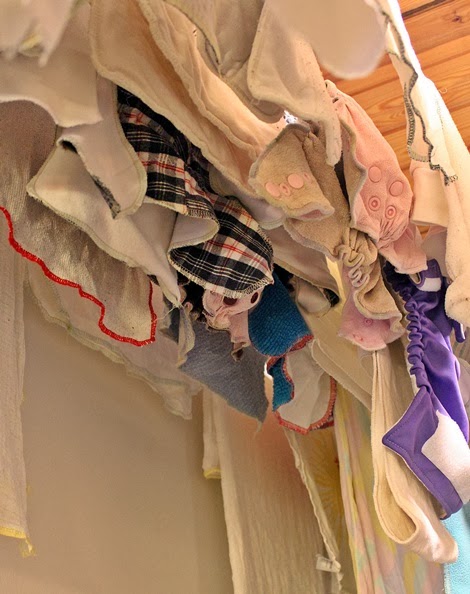
Likka is now bit over four months old and we have been cloth diapering her almost from the time she was born. She was on the smaller side, only 2,8 kg (6,2 pounds), when she was born so at first all the cloth diapers we had were way too big for her and we had to use disposable ones for many weeks. But once she reached 3,5 kilos the diapers started to fit her nicely. When I was first reading about cloth diapers I was baffled by the variety in styles of the diapers. There are all-in-one diapers, pocket diapers, different types of inserts, flat diapers... you name it. But it's really no rocket science. Basically cloth diapers have just some absorbing material inside a water proof lining, just like disposable ones.


But why?
We started to use cloth diapers mainly for environmental reasons, but two other reasons have surpassed the environment. The other is money and the second is crafts. In the end the environment factor is not as important to me as I thought it would.

Before Likka was born I bought a set of used cloth diapers from a Finnish online flea market. The set had at least 30 diapers, plus huge amount of extra inserts and covers. The whole set with the postage cost less than 70 euro. So the cost of one diaper was really low. Later I also bought a smaller set of all-in-one diapers. I do not think we have spent much more than 150 euro on the cloth diapers or their materials, plus I can always sell these diapers again once Likka does not need them anymore.

So far cloth diapering seems to be very cheap, especially when those were bought used and I have done lots of them myself. Which brings us to the other reason why I like to use cloth diapers on Likka. Because I enjoy crafts I have really liked making the diapers and their covers myself. Cloth diapers do not have to look perfect and it does not require much know how or time to make diapers. Especially flat diapers, prefolds and extra inserts are so easy to make and the materials for those can be found from any home, like the ugly or worn towels you don't use or clothes that you don't like anymore. Or the bed sheets which are so old that they have torn.


What type of diaper to use?
I'm not going to get into details about brands, since I don't know enough about different brands and babies are different in shape and size so one brand might not fit all. But I have preferred so far to use separate diaper and cover on Likka. Newborns do not move that much so it is quite easy to combine the cover and the diaper insert and put that on. But I have noticed that now that Likka moves more the all-in-one diapers do seem quite handy. The good thing with the covers is that those can be used again and again with out washing them in between if they have not gotten poo on them.

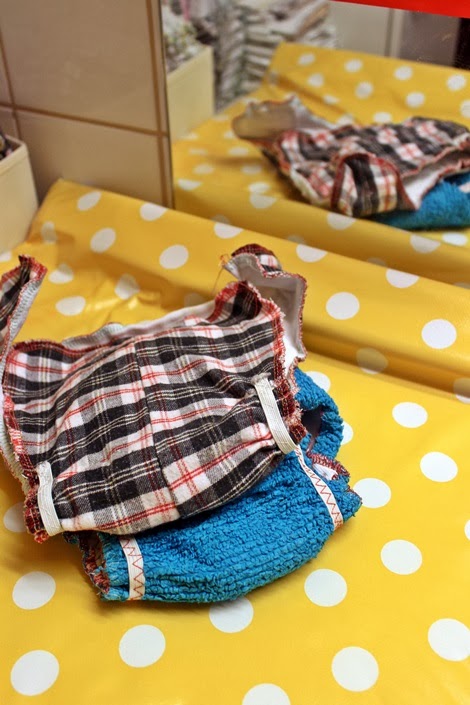
I have liked to use PUL (polyurethane laminate) covers, I haven't used the knitted wool ones much (these and these), those have been quite big still. I prefer PUL covers with velcro attachment, we also have a few with snaps, but I don't think those have enough adjustment in size.


Inside the PUL covers we have used separate fitted diaper or a folded flat diaper. I have also made a few fitted diapers which we have used a bit, those too were too big for a long time. When Likka was about two months we started to use an additional insert in the diaper for better absorbency. The diaper was always soaked when we changed it, so I figured it could use some extra material. I made lot of these inserts myself and sewed on them a dry cloth on the outer surface. The dry cloth is supposed to keep the diaper feeling dry even when it's wet. Likka's skin didn't seem to mind even when the diaper felt wet, but I just felt more comfortable having this technical material between her skin and all the wet cotton. On some of the inserts I also used some technical material from a sport underwear as a dry cloth. I'm not sure if it works as well as the official dry cloth but to my hand it feels drier than the wet cotton anyway.


Have the cloth diapers worked?
The cloth diapers do occasionally leak from the crotch but on the other hand the disposable ones occasionally leak from the sides and for some odd reason the poo travels upwards to her back on the disposable ones and get her clothes dirty. But usually both work fine and we do not have to change Likka's clothes very often because of accidents. One big difference I've noticed is that the disposable diapers really fast start to smell like pee, in some disposable diaper brands it's more obvious than others, but the cloth diapers never smell like pee.

Is there lot of laundry?
I'm sure you think there is lot of laundry now and of course there is more than before, but not as much as you would think. I at least have been surprised that I do not have to wash laundry everyday like I thought I would. I wash laundry about four times a week as in before the baby I washed laundry once or twice a week. We do not have a dryer so I'm really happy there hasn't been that much laundry after all.

I wash the diapers using hot cycle and if we have dirty sheets or towels that are also washed in hot cycle I wash these together with the diapers. I know that sounds bit discusting but everything ends up clean anyway.


So all in all we have been very happy about cloth diapering, I'm really pleased we desided to give them a go. I think the diapers were really money and time well spent.

Friday 24 January 2014

Little cowgirl


I went through part of my clothes cabinet not so long ago and found there a bandana I got from a summer camp in my early teens. I had thought that I could use that bandana to cover my hair when painting, but the bandana is just a bit too small to use that way, so I newer use it. I couldn't make myself to throw it in the trash either which is why I made drool/burp bibs from it.

I was able to make two drool bibs, I was hoping that I could make them from all four corners but the side of the bandana was too short and I had to settle for two. The back side of the drool bib has thicker cotton fabric since I do not think the thin bandana fabric is very absorbing on its own. The bib can be snapped close with the press fasteners on the back. I used three male fasteners and one female on the other bib and three female and one male on the second, that way I was left with even amount of fasteners.


I did not use any pattern for this, so incase you want to make a similar one, here are the measurements. But if I would do these again I'd cut the fabric deeper from the front, I've marked that with the blue dash line.


So like said I made two of these, but you are only seeing one. I gave the other one to a friend already, her child burps quite a lot. Likka does not burp much but drools commendably.

Next week is all about cloth diapers. So prepare yourself for a cloth diaper overdose.

Wednesday 22 January 2014

Baby vest

There is a particular reason I've been making so many cardigans for Likka. We finally got winter here and eventhough the heating in our home works great and the temperature inside is about the same as it is on summer, the floors do get cold. I myself need to wear wool socks all the time, I think it's a bit drafty on the floor level. And do you know where Likka spends most of her time when she is awake? On that cold floor of course. Well there is a rug or a blanket underneath her but still I think the floor is a bit cold place to be.


That is why I have made her those cardigans and now a vest. I had some material left from the red wool cardigan my mother gave to me. From the left over of the cardigan sleeves I made a wool vest for Likka. This time I was able to make the neck bit better, it's just the right size. The vest can be opened from the other shoulder (like Likka demonstrates here) so it's easy to put on.


The vest looked a bit dull without any decorations so I added the flowers on the waist. The stalks are this zigzag ribbon and you know the ribbons that are attached to shirt neck on stores so that the shirts do not drop off from the hanger? I always remove those ribbons and since it's impossible for me to throw away crafts material I save those ribbons. Now I finally used two for the flower buds.

Monday 20 January 2014

Wool cardigan converted to a wool overall

(Argh, the colours in this picture are all wrong!)

My mom gave me an old red wool cardigan to use as a crafts material. It was in perfectly good condition, just the button holes were torn.

Now we finally got winter here, from plus five it suddenly dropped to minus fifteen Celcius and we actually got some snow! That is amazing! The snow came really late this winter. But this means that Likka needs something really warm to wear. Likka has a few wool overalls, but those are still too big, so I quickly (well... it was supposed too be quick) made her another overall from the old wool cardigan. It's not so common to cut knits and sew them, but it really isn't much different than sewing regular fabric. You just need to make sure every stich row from the knit is sewed close so they don't unravel, but using a short stich on the sewing machine should do the trick.


Like I said it was supposed to be quick thing to do, but I wanted to sew on top of the neck rib knit with a double pointed needle I had bought some time ago. With that needle I need to have a second thread running from the top of the machine and there is a hole for somesort of spool holder. I just don't have that holder so I've used a random stick on the place. Now I took one very large needle and placed that on the hole, but the needle was too slim and it dropped right into the sewing machine. Outch. I was too afraid the needle is somewhere inbetween the moving parts of the machine so I did not dare to sew anymore and I had to open up the whole machine to remove the needle. Well the good thing is that I did clean the insides of the machine from all the lint while it was open.

Then I took another stick to use as a spool holder and started sewing. But it seems that the double pointed needle did not do a good job on the seam, it did not work at all. I just got long thread runs on the sides, I'm not really sure what was wrong, maybe the fabric was too thick, I don't know. Since that did not work out I decided to use regular zig zag on the seam.
Then I noticed I had made the neck too large. Whole thing looked like an overall for dogs, it looked hilarious. It would have been perfect for a small bulldog. :)

So I took the rib knit apart from the neck and shortened it and then reattached it. I think the neck is still too large but I don't want to take it apart again.


Wednesday 15 January 2014

Crafts basket

Small things can make world of a difference. I started to make a crocheted basket last year, but I unraveled it because it looked horrible. Then I got a book Virkkuri (only in Finnish, so far) by Molla Mills as a Christmas present. The book has lots and lots of new ideas where and how to use tradional chrocheting techniques. The book has excellent pictures and fresh feel. 

So I got the book and there were two hints about crocheting a basket, the first was instructions on how to make a 90 degree angle turn between the base and the sides of the basket and the second was to use labels. Those two ideas made all the difference. Even though I crocheted with the same yarn and made the same size as the trial before, the basket just ended up much more modern and crisp. I love it.


Monday 13 January 2014

Ostrobothnia cardigan

Ostrobothnia is an area in west of Finland. It is famous for its flat landscape, agriculture, people being bit cheap and the Jussi sweater. My dad is from the Ostrobothnia and so is my mother's mother. For some odd reason I have always been proud to say I have roots from there. Likka has roots from there too of course and so I made her a Jussi sweater inspired cardigan.


After the exponentially ascending learning curve from the previous cardigan, I started to make this one from the top down. This time I made a smaller neck and the knitting went very smoothly. I did do a bit of a mistake when calculating the placement of the arms but it does not really show on the finished cardigan.

On the previous cardigan I made too many button holes and I actually prefer zippers anyway so I sewed a zipper on the Ostrobothnia cardigan.


I'm really pleased with this cardigan, it is slightly too long, but that means there is some room for growth.

Friday 10 January 2014

Cardigan attempt

Often I'm too eager to start a project so I forget to plan. Inspired by the On the edge of the cloud - pattern by Muita Ihania I started to knit a cardigan for Likka. I actually did do a test knit first and calculated how many sticthes I would need for the waist, but I think I either miscalculated or something else got wrong because the waist got too wide.

I knitted from the waist up. Once I hit the arms I started to look for instructions on how to make the arms. I did not find anything in the exact same size and yarn weight, but what I did find was a cardigan knitted from the top down. I had not realized I could have knitted it like that too and that seemed so much easier and better compared to the waist up style and I got bit deflated by my already started cardigan. 

So I did not find any good instructions and just started to knit from the top of my head. I knitted both arms and attached those to the body part. Then I knitted the straps (?) for the buttons, I assumed every ten rows could have button.


And then it was done. The waist is too wide, the arms compared to the waist are too narrow, there are too many buttons and the neck is too big. Also I was supposed to do the whole neck area with the blue but I run out of yarn and had to continue with the other colours.

I was not happy with this one and desided to make a better one. So... yes, I made another... that one on the next post.

Wednesday 8 January 2014

Jewellery frame

My mom wanted a storage place for her jewellery as a Christmas present. She wanted something where she could see all her jewellery. She described quite well what type of of storage piece she would need and so me and my sister executed the idea. My mom even provided us some of the material. She had bought red burlap from a flea market and did not know what to do with it, once I saw the material I immediately knew how to use it.

From a trift store I bought a noticeboard. Me and my sister took apart the frames to attach the red burlap. We were thinking of painting the frames too but I did not have any good colours at home so we discarded that idea. We glued the burlap from the edges and only partly from the surface. I had also bought hooks from a home improvement store which we screwed into the board. Because the noticeboard is meant for pins the surface is quite soft and it was bit difficult to screw the hooks there straight.


(The colours on the top photo are most realistic.) Now because we glued the burlap there only partly hook earrings can be hung from the burlap. I draw images of a necklace and earrings to demonstrate how to use the jewellery frame.

Monday 6 January 2014

Tardis socks

A has two god daughters, the other who I made the hamburger and other crocheted food is 2,5 years old the other is 17 years old. The older one studies in England in Wales. The school building or castle is from the 12th century. That combined with English heating system must make the place drafty.

So she needed wool socks. Her mother thought she would want Dr Who inspired socks because she is a big fan of the show. I found a pattern for Tardis socks from Ravelry and knitted those for her as Christmas present. 


When I started making these socks I at first assumed that I would use the size 4 mm needles and bought three skeins of blue light weight yarn. I don't know why I did not check the instructions before heading to the store. Anyway at home I noticed I should have bought superfine weight yarn. Luckily the store I bought the yarn from had also the blue in superfine and I was able to return the wrong yarn and buy the right one instead even though I did not even have the receipt anymore.

Once I noticed I had to use such a slim yarn I was bit afraid these socks would be really burdensome to make, but I was so wrong. I finished these unbelievably fast, these were fun to knit.

Friday 3 January 2014

Kindling from pine cones

Hope you had a great New Year! Ours was bit different than usual, although we did see the fireworks at midnight and did sleep in on the first of January. I feel like I should have somesort of recap of the year 2013, but that recap would be very short. The big thing from the year 2013 is of course Likka and no other thing really stands out after that.

So... I'm just going to continue writing "standard" blog posts as usual. First few blog posts of this year are of some Christmas presents we made.

~ ~ ~

Pine cones burn very well on their own, even so well that you can ruin a fireplace if you burn pine cones alone. But if you do want to make the pine cones burn even longer you can dip them into stearin, which is exactly what we did, because we wanted to make kindling. When starting a fire few pine cones make very good kindling.


So for kindling you obviously need pine cones and stearin. We made these pine cone kindlings for a present and I picked the cones from the near by small forest before Christmas. It would be better to pick these at summer just when the cones drop. Now many of the pine cones had already composted a bit and I had to be really picky with them. Also I needed to dry them at home for a week or so, before we were able to use them.

Once the cones had dried and opened we melted some stearin in a tin can. Stearin is best to melt with boiling water. Once the stearin was in liquid form we dipped each of the cones individually into it. The dipping was done twice to make the layer of stearin thick enough.


When the stearin had harden we placed the cones in a basket which I had bought from a trift store. The basket can be also burnt. The cones made a beautiful gift, to me it looks like the cones are covered with ice. Even the person who received the gift said that it's a shame to burn these.


Related Posts Plugin for WordPress, Blogger...